When you develop SSIS packages with custom functionality, either self signed assemblies or script components/script transformations that implement assemblies you got from codeplex, it sometimes become a nuisance to get them into GAC on production machines. What often happens is that when you try to run the package in earnest via the SQL Agent, it fails to find the assembly.
In my case I’ll be adding ionic.zip to my SSIS package dataflow in order to stream data into encrypted zip files.
If you would like to try out a cool way to deal with zip files in dotnet, I recommend it: DotNetZip – Zip and Unzip in C#, VB, any .NET language
So back to trying to run custom components and assemblies in SSIS packages. I bet you have seen something like this at some point in your career:
Error: System.IO.FileNotFoundException: Could not load file or assembly ‘Ionic.Zip, Version=1.9.1.8, Culture=neutral, PublicKeyToken=edbe51ad942a3f5c’ or one of its dependencies. The system cannot find the file specified.
File name: ‘Ionic.Zip, Version=1.9.1.8, Culture=neutral, PublicKeyToken=edbe51ad942a3f5c’
This tells us that our dll can’t be found when the SISS execution reaches the dataflow that uses it.
I wanted to find a solution that helps me deal with this in a good manner that is pretty future proof.
The first thing that came to mind is doing what I always recommend: use powershell. The problem is that sometimes you don’t have powershell, or an older version or aren’t allowed to run what scripts you want in production.
The next thing that was suggested to me was to copy gacutil.exe over to the production environment and do my deployment that way. That is not recommended though as it violates the license of Visual Studio SDK.
I tried out a couple of different plug ins for Visual Studio to be able to create an installer and the one that worked with the least hassle for me was WiX.
These are the steps I took to get my first working installer that added dll-files to gac:
- Make sure that your assembly is signed. If you are unsure about whether your own assembly is signed, then it probably isn’t. Since the example is of someone else’s assembly then it probably is signed.
- Make sure that your installation of Visual Studio is compatible with WiX (I use Visual Studio 2015 Developer)
- Download the latest stable release of the WiX toolset that works with your version of VS.
- Put the assembly (dll file) in any folder on your computer and have the corresponding path at hand. It doesn’t matter where the file is as long as you can access it when building the project.
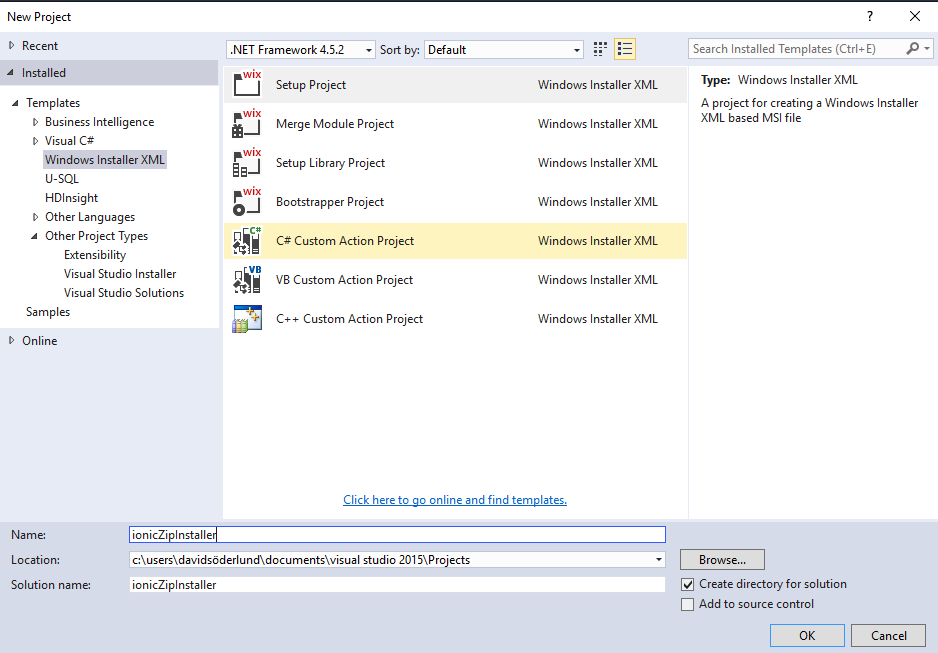
- Create a new VS project for WiX as shown in this picture:

- Put an XML fragment into Project.wxs that points to your file:
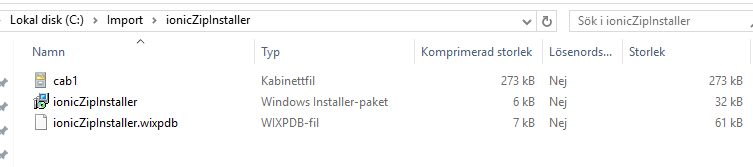
- Set the project to release mode, build it, and go to the bin file to take a look.
- The three files are all needed for your installer, so zip them together and you are basically done:
- Move your zip file with the three files to the machine you need the DLL on and run the installer. If you want a prettier installer with more options and so on, put more effort into the WiX project!
Here is the excerpt of the xml that worked for me, mileage might vary so look up the documentation and the comment sections of other articles you find.
<Fragment> <ComponentGroup Id="ProductComponents" Directory="INSTALLFOLDER"> <Component Id="Ionic.Zip"> <File Name="Ionic.Zip.dll" KeyPath="yes" Source="C:\Import\Ionic.Zip.dll" Assembly=".net" AssemblyManifest="Ionic.Zip.dll"/> </Component> </ComponentGroup> </Fragment>